"i mean... i GUESS those could be pixels": How I rendered Bad Apple in my Finder window
By Morry Kolman/WTTDOTM
Update: source code now available here
I wanted to write up a short blog post about how I rendered the entirety of the Bad Apple Music video in my finder, (not that short, oops), so here goes.
I just finished taking a class at the School for Poetic Computation called Imperfect Pictures (taught by Molly Soda), and our final project was to produce some sort of folder / directory. I was slammed during the week I was supposed to create it, busy with interviews about a different project of mine (Traffic Cam Photobooth, also a product of that class, much longer post on that forthcoming) the day of the final session.
Grasping for what to do for “produce a folder,” I realized I had skipped the assignment for the class session on filters, and had the idea of taking an image, putting it through an ASCII filter, and then saving the text output as file names line by line to recreate the ASCII art in the finder. I also made all the folders and files hidden, because I wanted the directory itself to be interactive and unhiding the folders and text files gave it that quality (you can download a zip of the folder here).
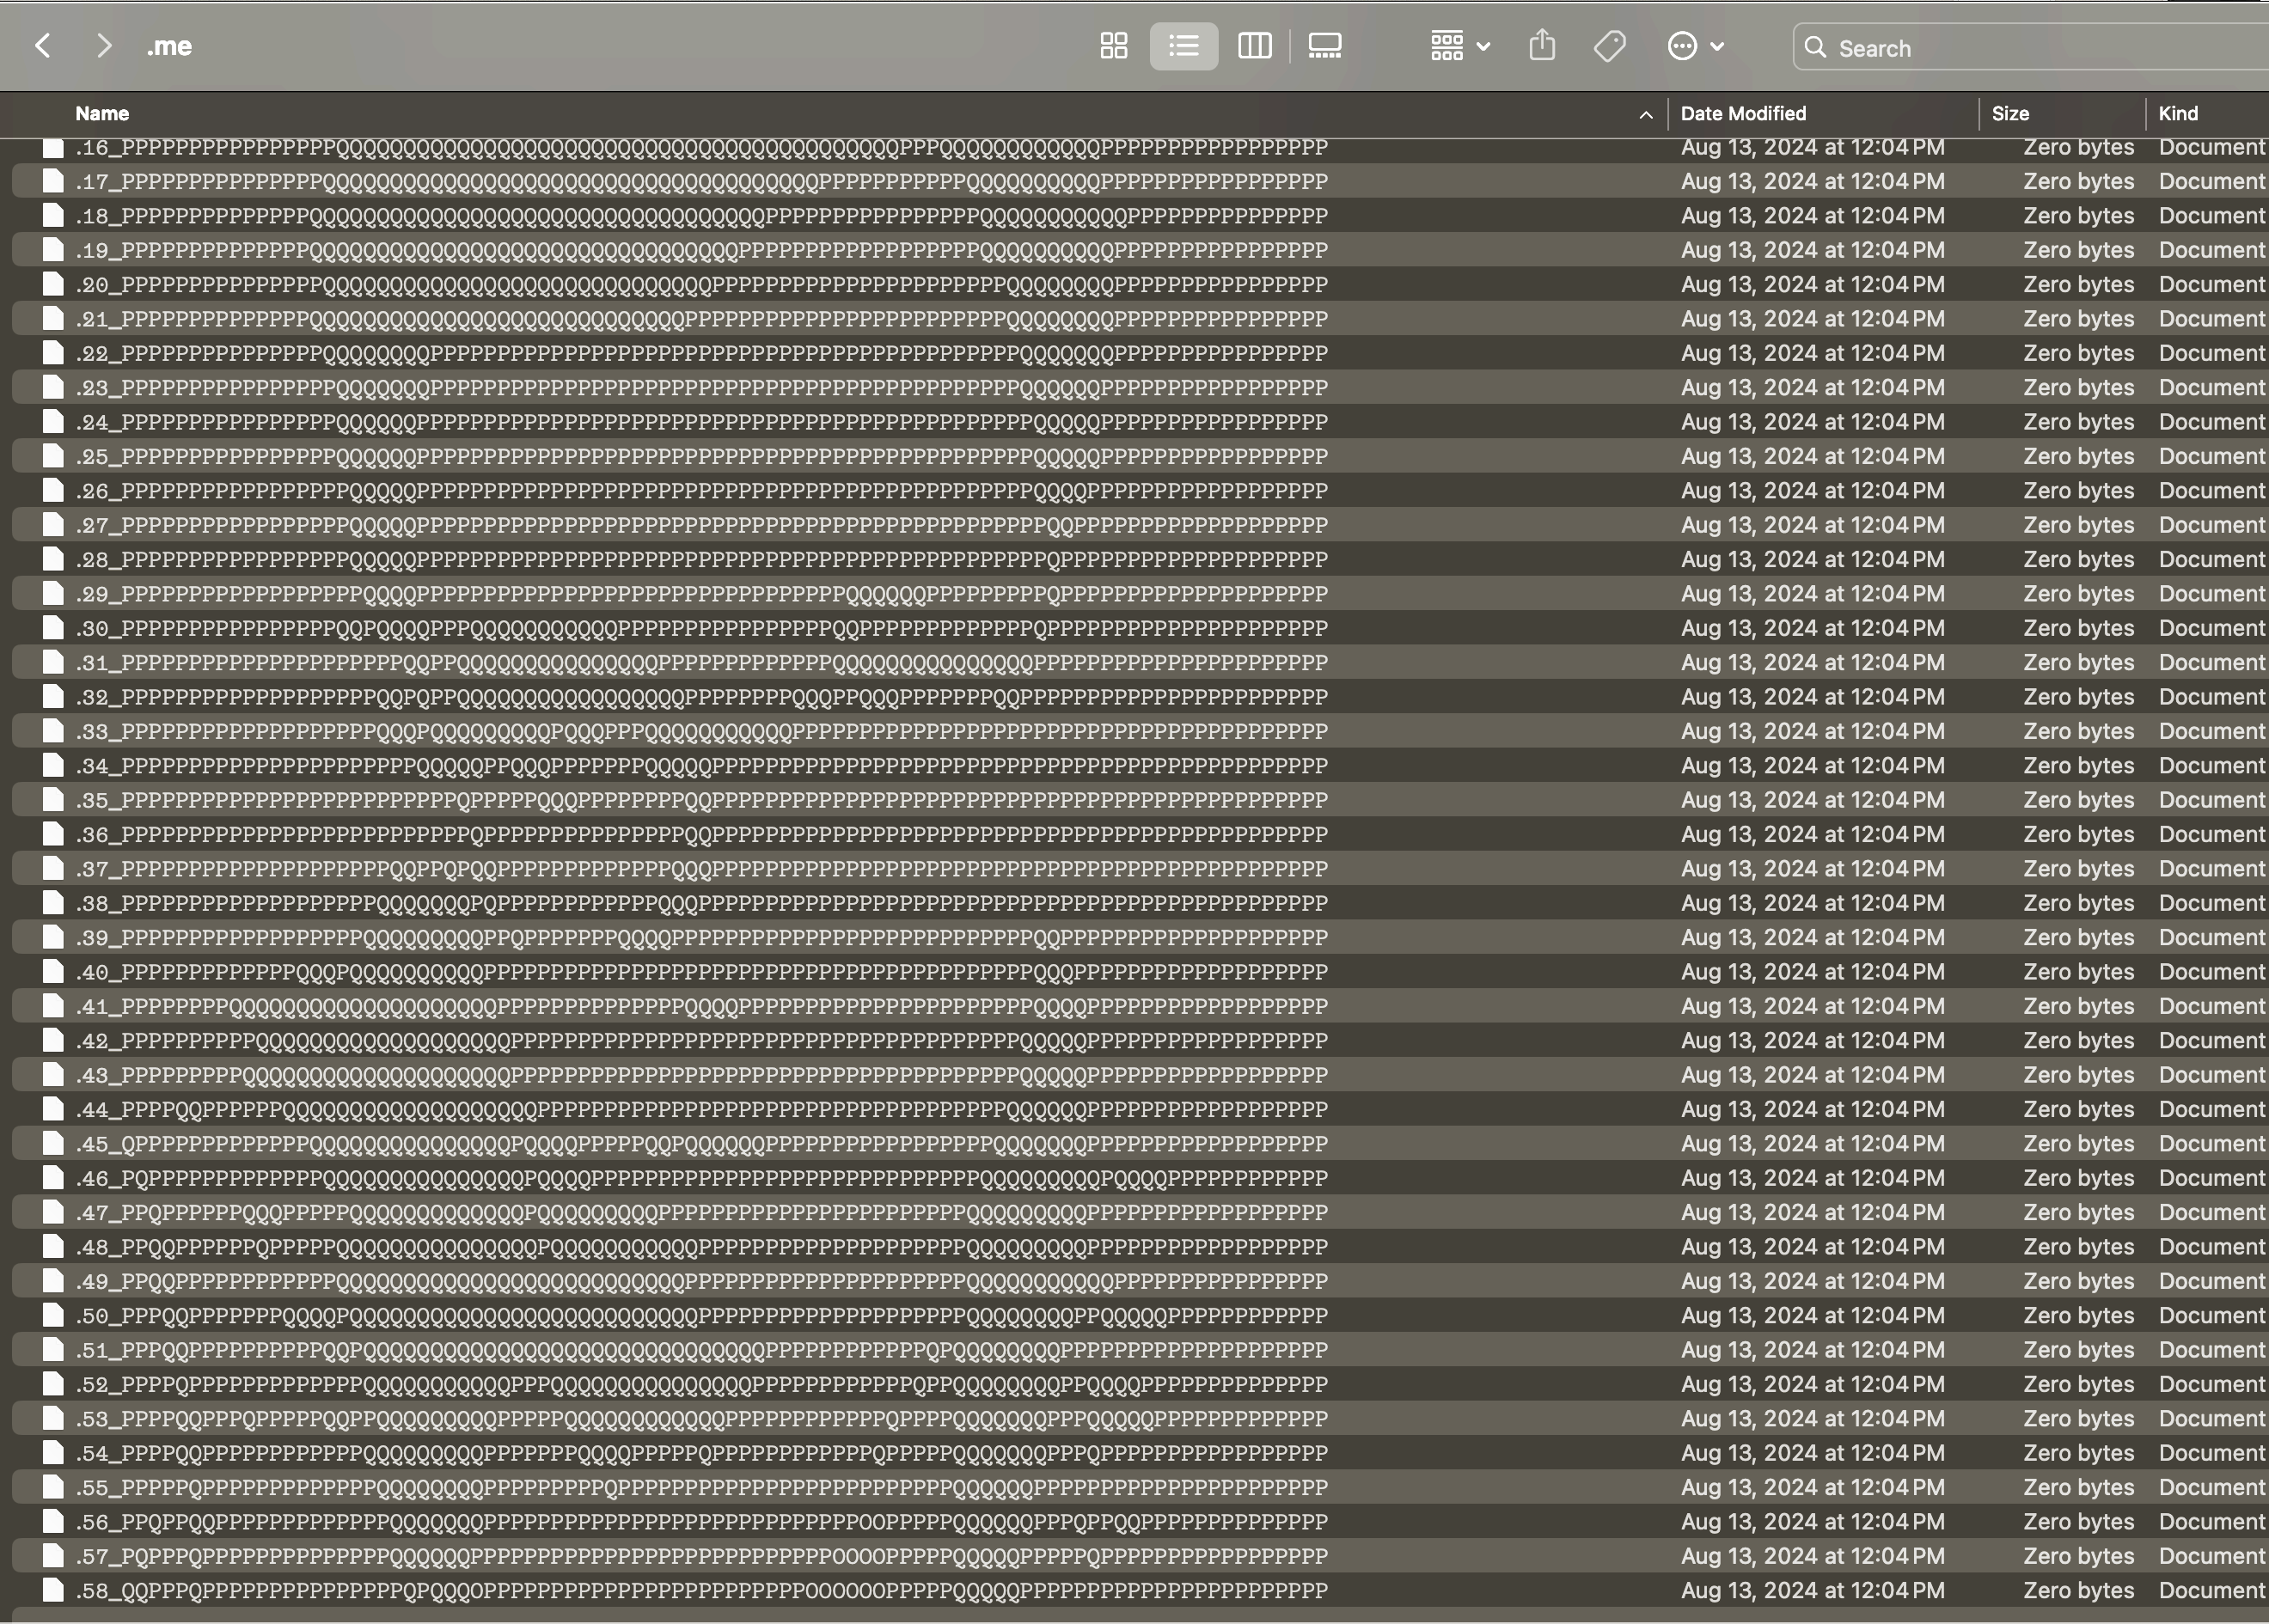 Fig 1. ASCII self-portrait as hidden files in a hidden folder (i bumped up the contrast and brightness bc hidden folders are hard to see on a screenshot).
Anyway, my classmates liked the folder, and I thought the idea was pretty neat, so I spent a few days pursuing it further. I quickly ran into one problem (which, as you will soon understand, this video conveniently sidesteps), which is that the Finder is made by Apple, and Apple has a very specific idea of what kind of font they want to use there — their SF Pro Display font. I got around that for the original folder portraits by using a subset of characters known as “mathematical monospaced” characters that are set aside by Unicode specifically for when you need to render aligned text for things like math equations etc. These are useful, but not as useful as you’d hope. Unicode saying a character should be spaced one way is one thing, whether or not a font foundry actually does that is another. For some completely incomprehensible reason, the capital and lowercase monospaced mathematical characters in SF Pro have DIFFERENT WIDTHS.
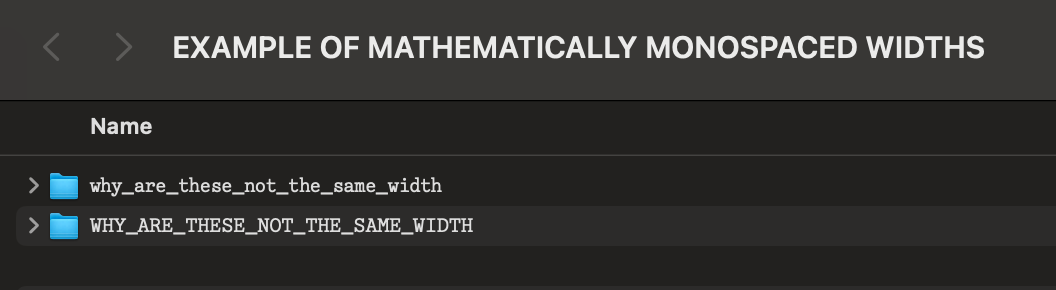 Fig 2. Stupid.
The reason that matters is that I was halfway through a truly horrific script to programmatically render, measure, and save the display width of every unicode character in SF Pro Display with a bit of Python before I realized that (a) it was only going to keep getting more annoying and (b) I was putting the cart before the horse. I didn’t even have a system to convert images to ASCII strings in the first place. Maybe I should work on the ability to render an image in ASCII before I worry about how to do it in a way that renders in the finder.
Ok, let’s make an ASCII converter. Let’s forget font widths and just make the normal ASCII assumption that we are going to be using a monospaced font, and let’s make it easy on ourselves by only caring about black and white. The logic is pretty straightforward, we want to basically treat an image as an iterable grid, and convert each cell to a character. Here’s the basic approach:
- Determine how many characters wide you want your image to be (ie. characters per row of text)
- Open the image with Pillow
- Make an empty array to hold your eventual ASCII lines
- Take the width of the image and divide it by the amount of characters you want per row, that’s your effective ASCII pixel size, or how wide (and tall!) of a region one character will represent.
- Go down the first row of pixels in the image and start a string.
- Every X pixels (where X is your ascii pixel size), grab its average RGB value (or, if you’re like me and only dealt with b/w videos, you don’t have to average them because they’ll all be the same)
- Check if that RBG value is black or white depending on some threshold (I used >250 = white)
- Depending on the outcome, add a black or white square to that string
- At the end of that row of pixels, add the full ASCII string representation of that row to the big holder array, jump down X amount of pixels to the next row and do it all again
- At the end of this loop, you’ll have an array of every line of ASCII needed to render your image in black and white squares.
- Then just loop through that and save them as files (I had written this in the original version of project for the class mentioned above, it’s in that linked zip folder I think).
 Fig 3. Here's what that looked like.
You might notice that a character takes up more space than a pixel, but we’re only using one pixel to determine what the character for the entire region should be. If, for example, the pixel we used for determining color was white in a region otherwise full with black, then this script would make the wrong decision. That’s fine with me. I figured that if it becomes an issue, I’ll write some region color averaging function, but this was an MVP.
So with this built, I test it. It works! I have a home-brewed ability to convert an image into ASCII and save it as folders. If I can do one image, I can do many, and you know what’s another word for many images stitched together? Frames.
But frames of what? A couple months ago, my friend and the other half of WeMakeInter.Net Alex Petros and I went to MakerSpace NYC, where we talked to someone who had built their own retro gaming console from scratch. In walking us through their process and the different games and tests they had made, they showed us how they validated their graphics system: by rendering the Bad Apple music video. It was cool to watch, and I love the idea of a piece of fan media as a popular graphics benchmark. In the same way that people delight in getting any random thing to run DOOM, I spent a bunch of time in the remaining months looking at people playing Bad Apple in truly ridiculous ways. It almost felt like the litmus test of what could be considered a display was what could be used to render Bad Apple. I really liked that idea AND the video is completely in black and white. Cool. I’ll use this tool to make frames of Bad Apple. Done.
 Fig 4. Potatoes running doom.
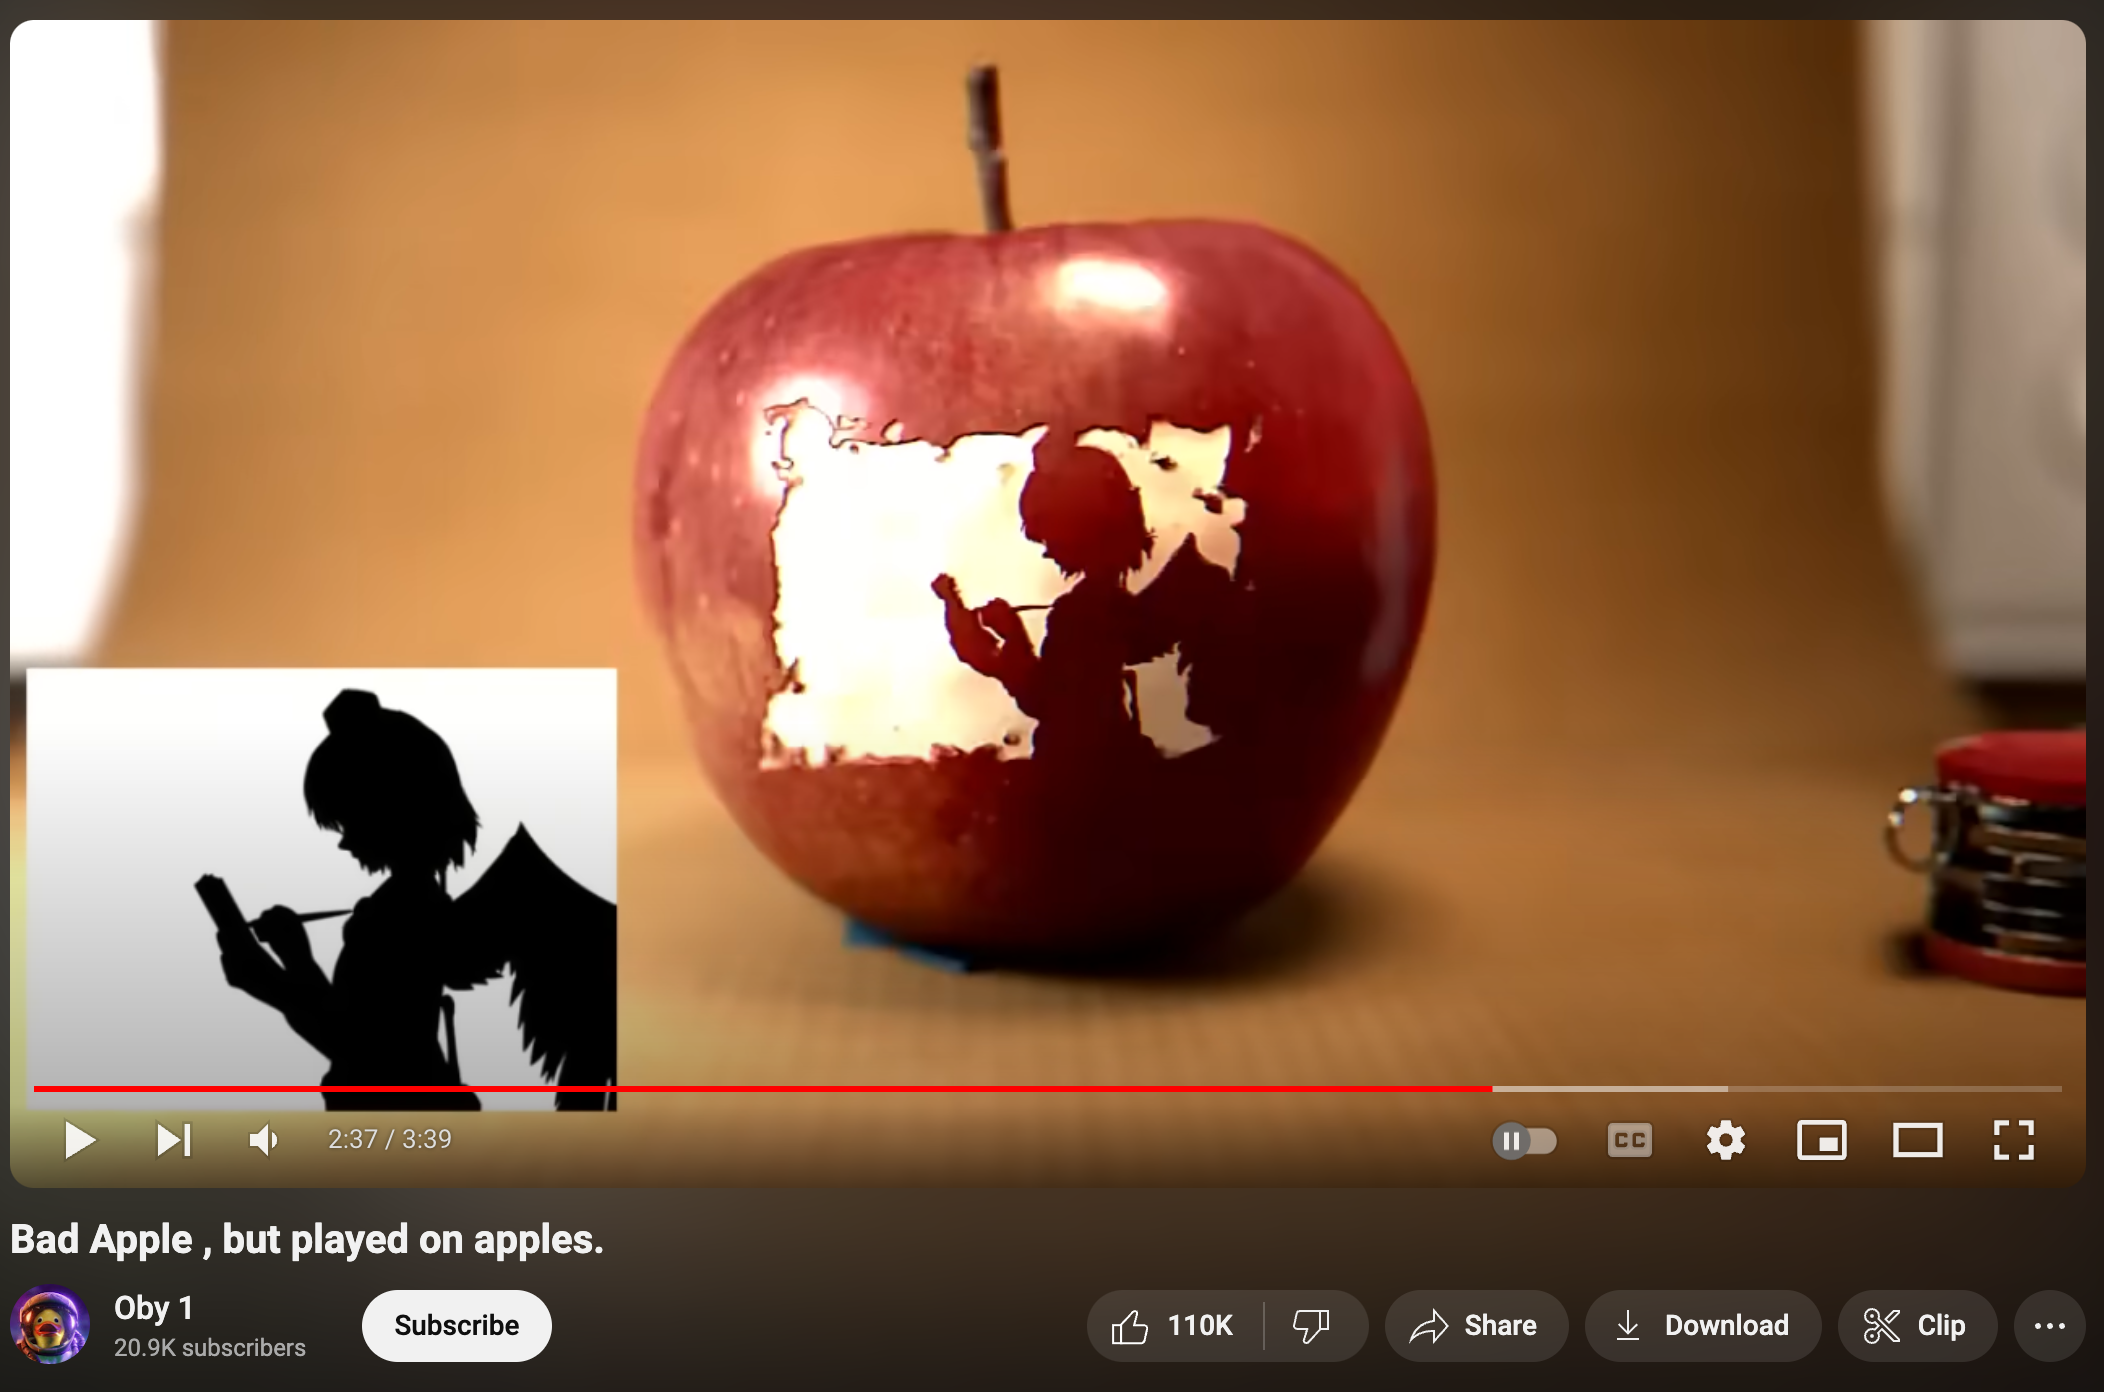 Fig 5. Apples running Bad Apple.
The problem, of course, is that a video player is a piece of technology built for drawing, displaying, and replacing arrays of pixels in rapid succession. The Mac OS Finder is uh… not that. This issue first presented itself to me in my initial implementation of the video. After converting all the relevant frames to images (I started with a subset, something like 1 out of every 10 frames) with ffmpeg, my script would loop through the folder of images, make them into rows of ASCII, update the contents of a folder called /bad_apple/ to have files that matched those rows, delete those rows to start the next one.
As you can imagine, the video was… stuttering at best.
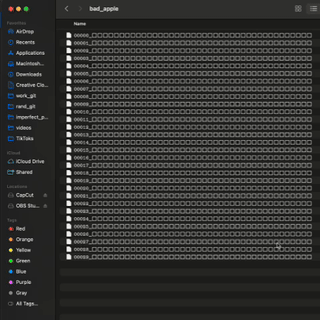 Fig 6. Gif recording of first attempt.
So I needed a different solution. I remembered watching a presentation by my friend Nolen on how he implemented Flappy Dird (a flappy bird clone played in the finder) and went to check out his repo. I spent about 10 seconds looking through it before deciding that (a) he is a much cleaner coder than I am and Flappy Dird was a much more complex program than I was trying to run, meaning that (b) I didn’t not actually want to parse whatever the hell his AppleScript/Python behemoth was doing and (c) the easier way to get an answer about it all was to just text him. I did, and he linked me to his great blog post about the project, and told me to think about frame buffers.
Frame buffers, now there was a concept I had always heard about (especially in a very parallel context of Super Smash Bros Melee netplay code), but had never implemented. The idea itself was pretty simple: It takes Finder a certain amount of time to open a folder and show its contents. While we must SHOW the finder windows / frames sequentially, we can make them BEFORE we show them, so that the only real work that the computer needs to do quickly is switch which finder window is in front.
Nolen had already built this, so I tried to start by just ripping his code for my own purpose. He used a 2-frame buffer system - written in AppleScript - where each successive window/frame of Flappy Dird would be opened in behind the currently active one, then be brought to the front while the now-bottom one got updated for the next frame, and so on. In trying to implement this, I realized that I had a big luxury that he did not: I did not actually have to make any of this work in real-time. If I am trying to record a video of my finder, I can just make all of the folders at once and then loop through them later. Cool. I changed my script to save the files of my ASCII frames to individual folders for each frame, and got to work.
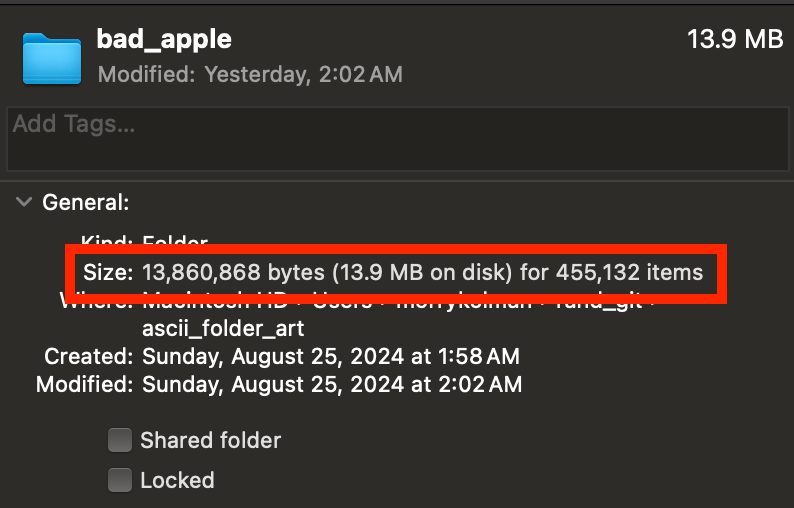 Fig 7. Can we appreciate this insane folder size : items-in-folder ratio.
But hold up, I thought, who even NEEDS a frame buffer? The stuttering in my last video was caused by all of the creation / deletion. If I’ve already created all the folders and files, I’m not creating or deleting anything. I should just be able to loop through all the folders and record them that way. That was a good enough place to start, and so I (with some help from AI, I did not really want to get deep into the weeds on AppleScript, though I ended up needing to anyway later), wrote up a simple loop to do just that. Open a finder window, navigate to my directory with all my frames, and then navigate to (or change the focus to, in AppleScript’s terms) to the next one, and so on. This worked for a bit, but slowly became laggier and laggier. I still don’t have any idea why. Either way, the window became completely frozen after a few hundred frames, and so I realized I probably had to bite the bullet.
Another problem with using things that are not made for video to display frames is that there are like 50 different ways you can bootstrap a concept like a buffer and none of them are pretty.
My first one would open windows in the default manner, which meant every frame opened slightly diagonally and down from its previous one. No good.
My second one managed to get the frames to always end up at the same size as the ones before them by setting specific coordinates and dimensions for where to display the image (eg. from 0,0 to 1000,1000}, but not before rendering as a much smaller window for an instant beforehand as they got resized. Also no good.
My third one was the same as my second one, but instead of coding a fix, I just used two monitors. This allowed me to have the frame windows open on the default monitor, then get “resized” to the second one, where I would be screen-recording. This also worked for a while, but broke down at the like 50-ish frame mark.
Somewhere in there I also ran into an issue where trying to preset sizing would stop working after a number of iterations. I don’t remember all the issues. It all felt so stupid and I kept just throwing different stuff at the wall.
Then, it clicked. I felt so stupid. I thought I was so smart for figuring out how make a buffer to avoid creating, displaying, and delete files over and over, that I missed the extremely obvious fact that I was just creating, displaying, and deleting WINDOWS over and over. Face, meet palm.
 Fig 8. Live O(1) or die O(n!).
I didn’t need to efficiently loop through several thousand windows. I needed to loop through just a few windows several thousand times. Not only is less work for the computer, but changing the target of an existing window (what it is open to) does not automatically bring it to the front the way making a new window with a specific target folder does. Not to mention, folders retain their sizes when they update, so unlike the weird sizing issues that come with making new folders all the time, I can refresh them over and over and they will stay right where they are. Taken together, all this means that I can dependably stack 4 windows of the exact same size, cycle through them, do all their target updating while they are not on the top of the stack, and altogether have a system that runs smoothly frame-by-frame. Here’s what the main part of the AppleScript code looks like (windowQueue is just a list of the 4 window objects).
      repeat while folderIndex ≤ (count of subfolders)
              set folderIndex to folderIndex + 1
              if folderIndex > (count of subfolders) then exit repeat -- for some reason doing the loop logic this way worked a bit better, idk why

              set oldestWindow to item 1 of windowQueue -- .shift(), basically
              select oldestWindow -- selecting a window brings it to the front

              set onDeckWindow to item 2 of windowQueue
              set target of onDeckWindow to item folderIndex of subfolders

              set windowQueue to (rest of windowQueue) & {item 1 of windowQueue}
              delay 0.2 -- this loop can run fast and jankily or at 5fps and smoothly, the latter is better for video
      end repeat
It works! The rendering part is done, now I just have to record it.
I do, and it looks fine, but I think I can do better. For one, I’d like it to be a bit higher quality. I see how high I can crank the resolution, and run into my Mac’s max window height capping the amount of files I can show around ~50 (any more files just make the window scroll). I decide I need a bigger screen, and connect my computer to my TV, allowing me to potentially quadruple the size of the video. Alas, it doesn’t really work. I can fit many more vertical rows into my screen now, but Apple has a limit on how long file names can be (255 characters), and I run into it when I try to re-render the file names to a longer horizontal resolution/width (each symbol counts as two characters, much like emojis). Fine, at least I managed to upscale it to capacity. Next, I feel like it needs an intro. Something catchy. I add an intro by putting my VSCode terminal in the screen capture before I start running the script, and have a nifty little title screen by typing cd ascii_folder_art && echo "\n\n\n\n\n\n\n\n\n\n\n\n\n\nBAD APPLE BUT IT'S MY FINDER WINDOW\n\n\n\n\n\n\n && osascript newer_buffer_approach.scpt. It makes for a quaint little opener, but it still doesn’t look right, doesn’t really grab me.
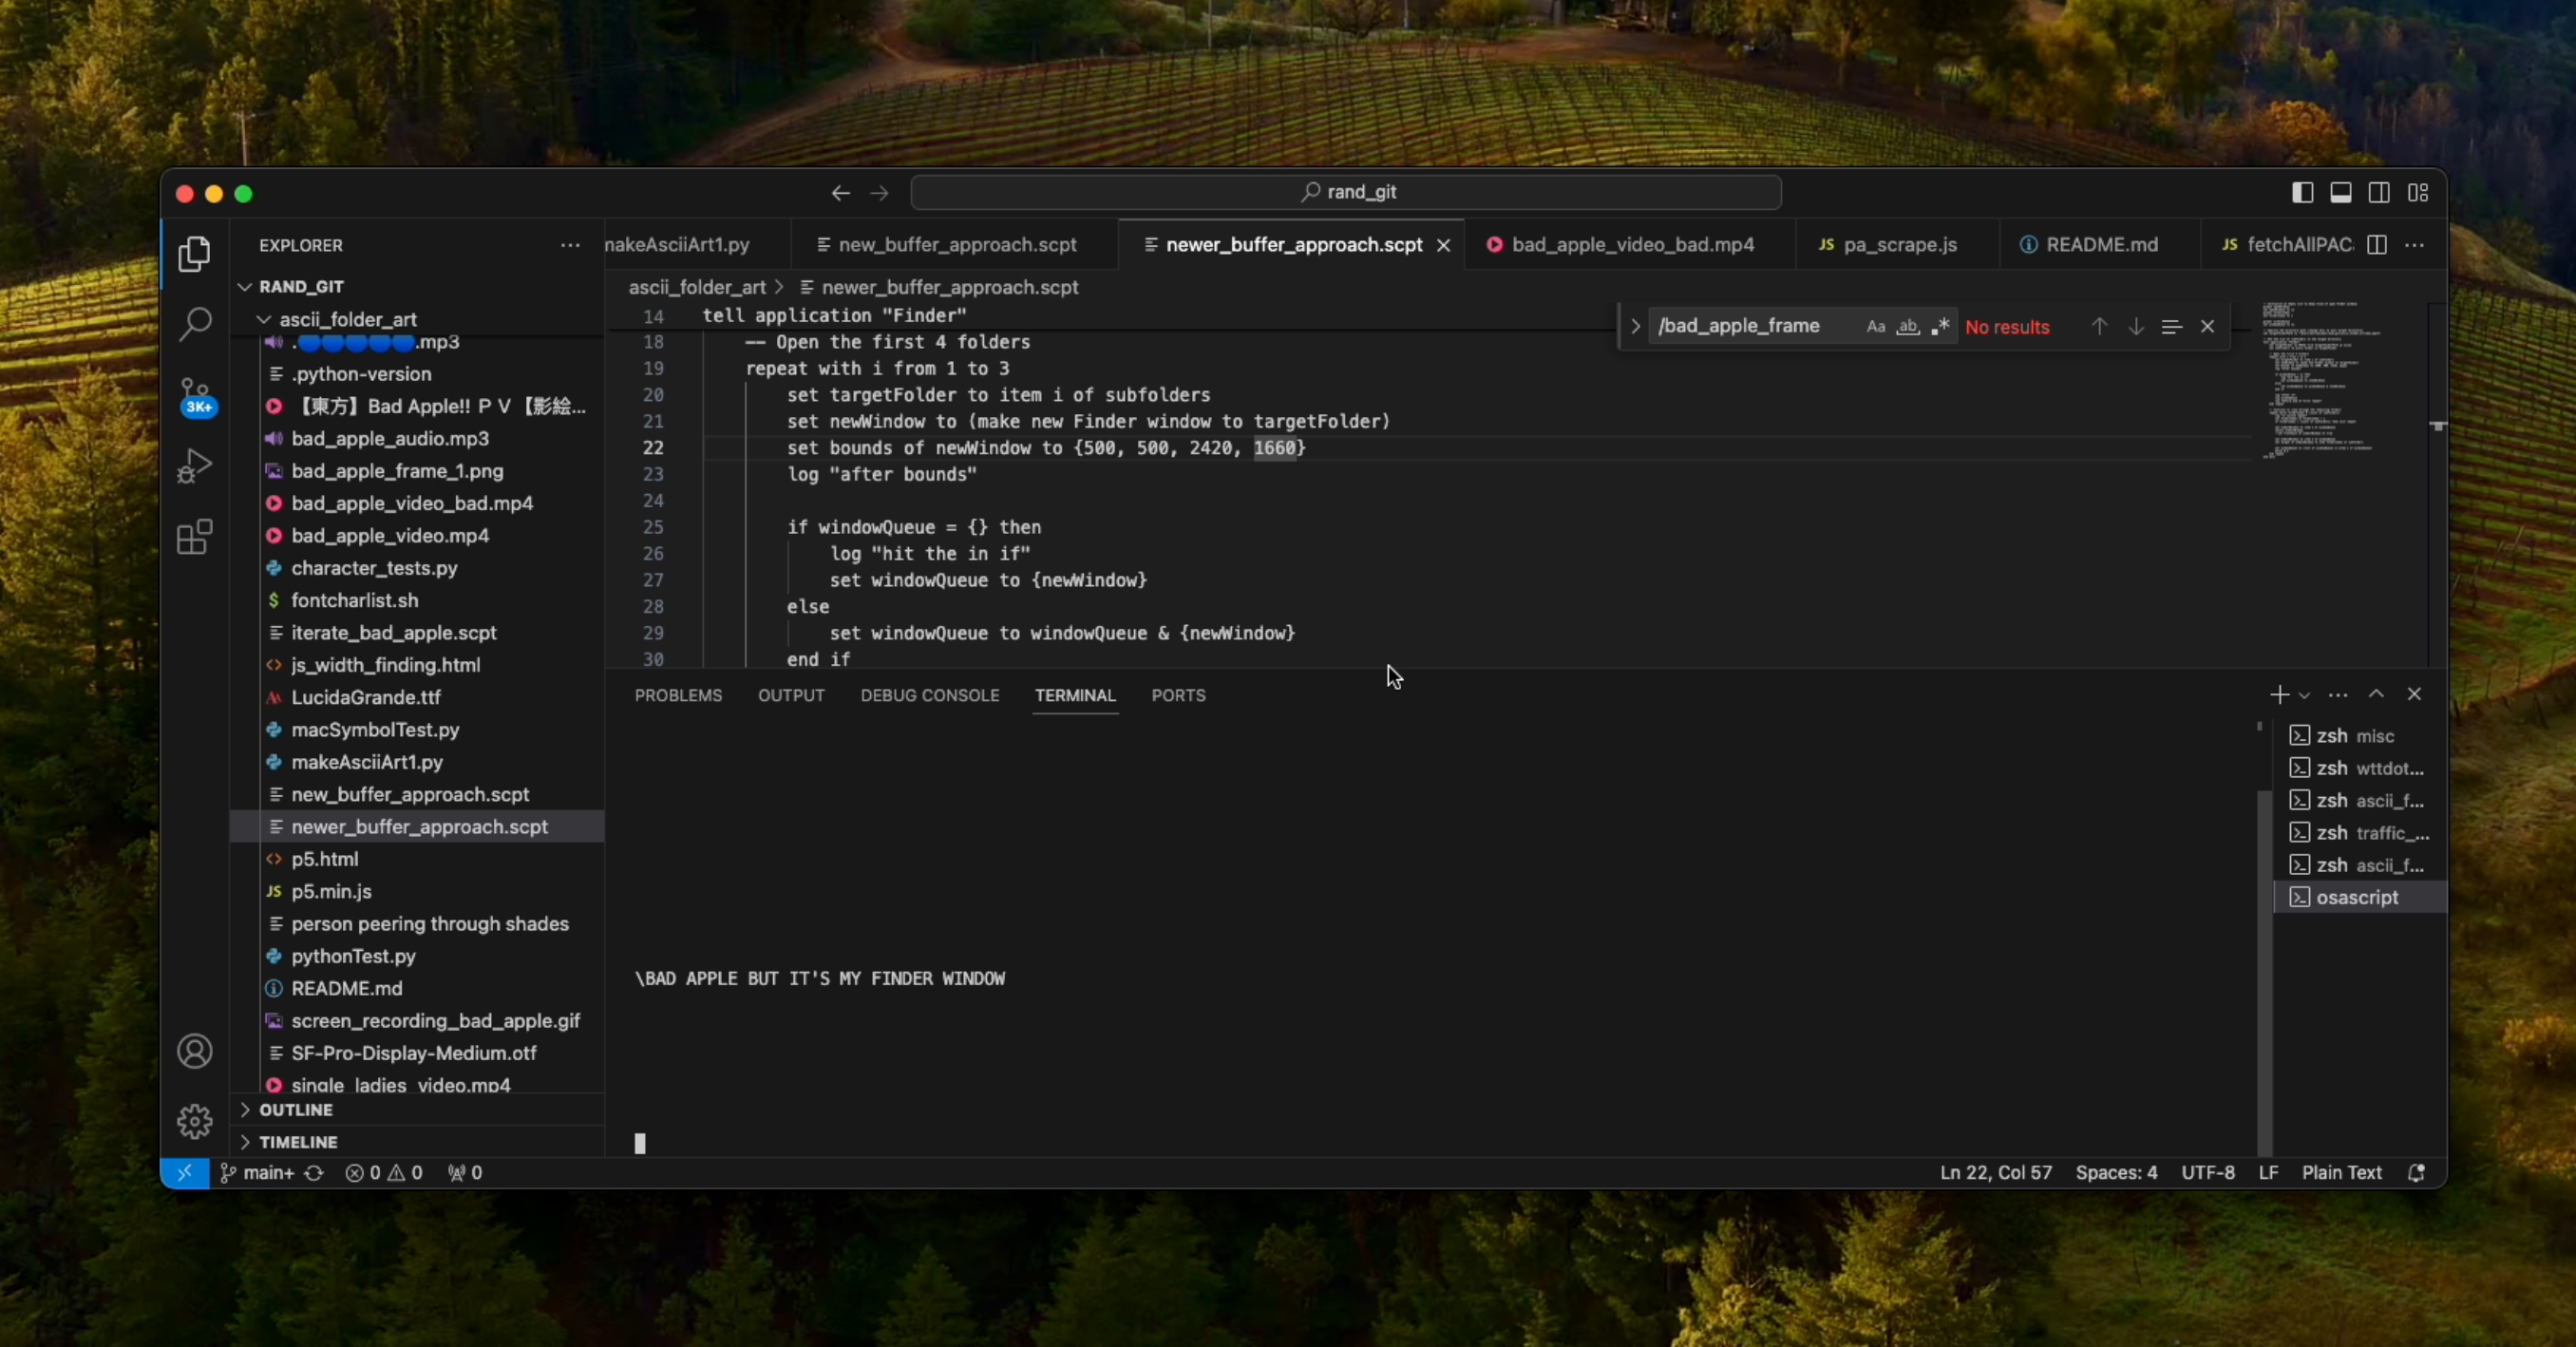 Fig 9. See? Quaint. Not grabby.
I look at some other Bad Apple videos, and while they all have a title screen, the good ones have integrated it into their medium of choice for the video itself. I make a title screen in photoshop and render that in my finder too, but it looks too static, it needs more movement. I decide I’ll screen record myself typing out the title screen, append that to the beginning of the bad apple video, export the whole thing, re-render ALL of my files based on the new-and-improved video with an introduction (not the first time I had to do this, at this point I had done it so often that my terminal history was littered with rm -r ./bad_apple/ && mkdir bad_apple) and then record that one instead. I do, and it looks great.
One problem, it’s 45 minutes long. My script ran at about 5fps the entire time, so the final step was speeding-up and syncing the recorded video to the timing and music of the original. I tried to use CapCut, which has quickly become my go-to video editing app (honestly it’s a great piece of software) but it can only do speed multipliers to the first decimal place, which left me about 10s off in either direction. But where out of the box guis fail, FFMPEG can succeed. Apparently its main speed filter can only speed things up 2x? But you can chain multiple of them together for arbitrarily fast speed-ups? Sure. Whatever. I do that. I take the ratio of speed between the long video I recorded and the real-time music video + intro, and get a ratio of 11.7439, which is also 2*2*2*1.497. Hence, I run this line of code ffmpeg -i ../../Downloads/TikToks/with_intro_cut.mp4 -filter:v "setpts=(PTS-STARTPTS)/11.7439" -filter:a "atempo=2.0,atempo=2.0,atempo=2.0,atempo=1.497" -y intro_right_length.mp4 there is probably something incorrectly done about that, but it worked. My screen recording was now the same length as the original video. I put them both back into CapCut (told you I love it), synced the silent screen recording with the audio from the original on the biggest beat-hit in the song (when Marisa, the character on the broom, grabs the apple in the beginning), and hit export.
And that brings us to here! It’s out. I posted it on TikTok, Twitter, Instagram, and YouTube. We’ll see if there’s any pickup. Maybe I’m neurotic but I swear to god the sound is off by one or two frames in the YouTube version which is a YT problem as they’re all the same original file, but that is a problem for another day.
Anyway, I hope you liked this write-up. It definitely went longer than I intended to, and I wish I had more screenshots of the process, but those are notes to myself for another day. For now, enjoy the video, and watch out for newer, cooler stuff coming from here soon.